The My Block Builder lets you take a number of blocks you select in the work area and group them together into your own My Block with a customized icon. For example, a My Block you create called "Robot Motion" might group a Move block (to control your robot’s wheels) together with a Sound block (that plays a sound file when the robot has traveled a certain distance).
When you create a new program using the same robot, you can just drag the "Robot Motion" block from the Custom palette and you will be done programming this part of the robot’s motion because you already set all of the parameters in the My Block.
Over time you may develop a library of My Blocks that you can use in other programs and trade with other MINDSTORMS users.
Creating a My Block
- First select a number of blocks that logically go together. As in the example above, you might choose a number of blocks that control your robot’s movement and choose to group them into a My Block.
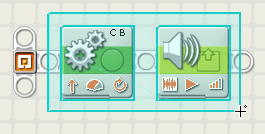
- Select the blocks by placing your mouse pointer to one corner of an imaginary rectangle that will surround all of the blocks you want in the My Block. Hold down your mouse button and sweep the pointer to the opposite corner of the imaginary rectangle, surrounding the blocks. When you release the mouse button, all of the blocks for your new My Block should be selected. Remember that a selection that partly covers a block will include that block in the My Block.

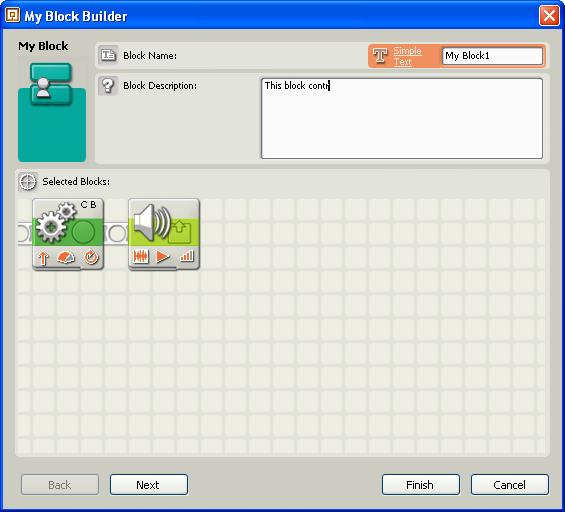
- With the blocks selected, choose the Make a New My Block command from the Edit menu at the top of the NXT software interface. This will open the first My Block Builder wizard screen (shown below).

- Give your new My Block a name and write a short description of what it does. For example: "This block controls the motors of a TriBot and plays a tone when the robot has traveled one meter." Click Next to move to the next step.

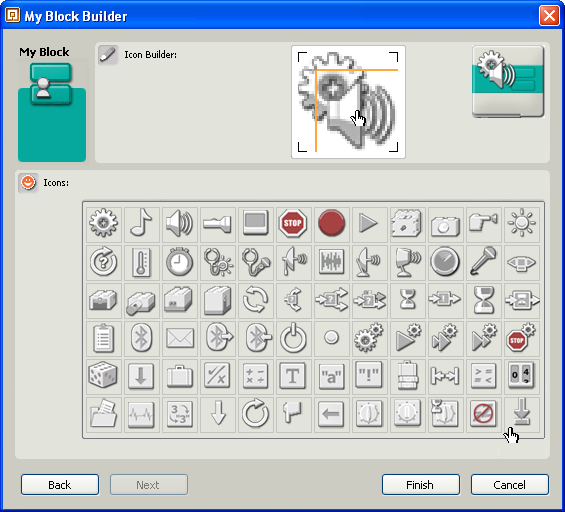
- Next, design your new My Block’s icon. Use your mouse to drag an icon or two into the editing box. Your keyboard's arrow keys will allow you to fine tune the positioning of the icon(s). The example block to the right shows what it will look like when you are done. Click Drag an icon or two into the editing box at the top of the window. Use your keyboard's arrow keys to adjust each icons final position. The graphic to the right shows what the block will look like. Click Finish when you are done. Your new My Block will appear in your current program and in the Custom palette, which is accessible by clicking the right-most tab at the bottom of the programming palette. (See image below.)

![]() Note: remember that any input or output data wires that crossed the selection frame (that first enclosed the blocks making up your My Block) will be created as input and output plugs on your new My Block’s data hub.
Note: remember that any input or output data wires that crossed the selection frame (that first enclosed the blocks making up your My Block) will be created as input and output plugs on your new My Block’s data hub.
If you want to change the available plugs of a My Block, you will have to create the My Block again, this time with the right plugs (and corresponding data wires) extending out of the selected area.
Editing an Existing My Block
If you want to change the performance of a My Block, you can edit the blocks it contains by double-clicking the My Block or by choosing Edit Selected My Block from the Edit menu. If you just want to change a My Block’s icon, you should select the block and choose the Edit My Block Icon command in the Edit menu––this will launch the My Block Builder where you can make any changes.
Managing the Custom Palette
You can add and delete My Blocks from the Custom Palette by selecting the Manage Custom Palette command in the Edit menu. To send a My Block to a friend, make a copy of the desired My Block and attach it to an email message. If you receive a My Block from a friend, choose the Manage Custom Palette command and drag the new My Block to the My Blocks folder.
You can create new sub palettes in the Custom palette by creating a new folder in the Block folder. Customize each sub palette's appearance by placing two 45x45 pixel Portable Network Graphics (PNG) files (called PaletteIcon.png and PaletteIconHilight.png) in the sub palette's folder. You can specify a tooltip for each custom sub palette by placing a text file called PaletteIcon.txt (with the tooltip text in it) in the same folder.